CyberForce Tryout
CyberForce Tryout
This blog details my findings and actions in response to the challenge provided here ->InstructionsPDF. This experience taught me a lot about network security, penetration testing, and vulnerability remediation. It also allowed me to practice my skills in ethical hacking and network analysis. The challenge was for a spot on our university’s CyberForce team. I made the team! I am ecstatic and will be competing in November. Throughout these descriptions I talk in the third person, as that is what I would do during a team competition.
OBJECTIVE ONE: REGAINING CONTROL
In order to start my search, our team used context clues.
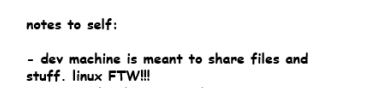
Figure 1: Notes from Laura
Figure 1 displays notes left by Laura about the network infrastructure. These notes led us to start with the Ubuntu machine, as our team believed these files could have important information for regaining access to the network.
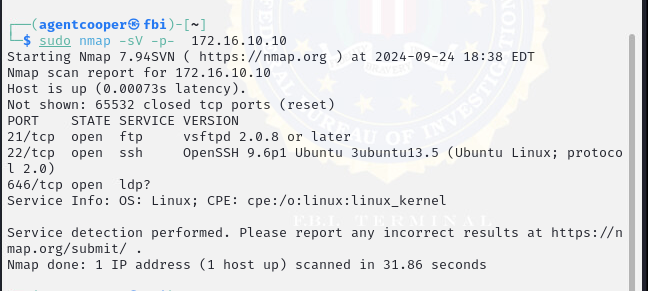
Figure 2: Initial Scan of the Ubuntu Machine
In Figure 2, network scans revealed that the Ubuntu machine was exposing both SSH and FTP on ports 22 and 21. Our initial attempt was anonymous SSH access, which was not allowed on this machine.
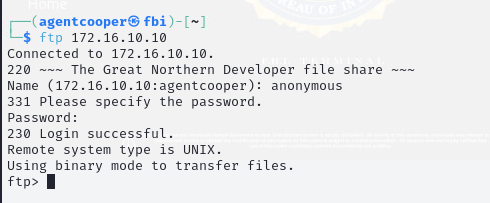
Figure 3: Anonymous FTP Access to Ubuntu Machine
In Figure 3, anonymous FTP access was granted on the Ubuntu machine. Further analysis revealed multiple files with anonymous access.
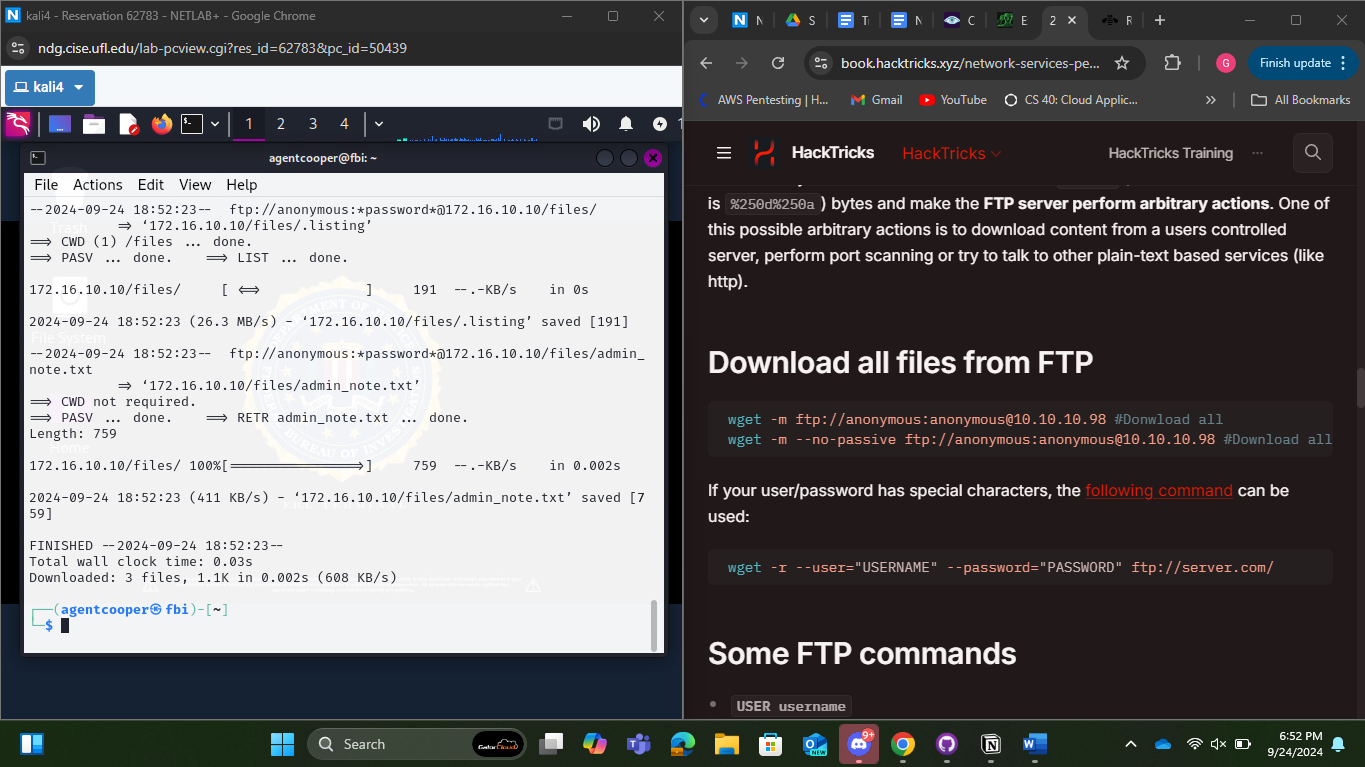
Figure 4: Command to Locally Get All Files from FTP
In Figure 4, our team displays the commands to anonymously get all files from FTP on the Ubuntu machine.
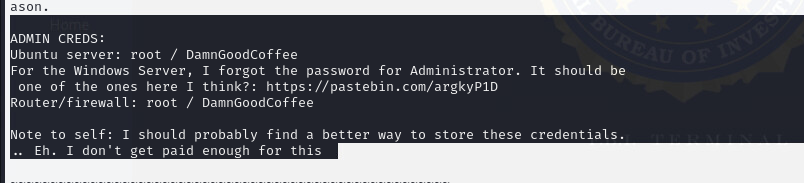
Figure 5: Checking Admin_notes.txt
In Figure 5, our team viewed the admin_notes.txt files and obtained credentials for both the Windows and Ubuntu machines.
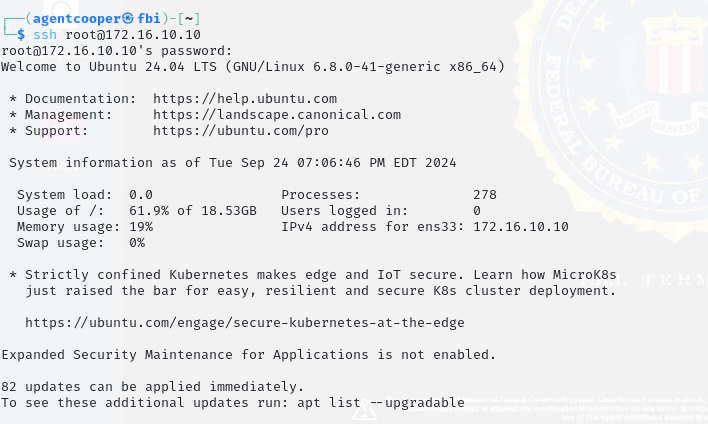
Figure 6: SSH Access into Ubuntu Machine
Our team obtained access to the Ubuntu machine through the credentials found in Figure 5, as shown in Figure 6. Our next step was using the Windows password list and username to gain access to the Windows machine.

Figure 7: Scanning of Windows Machine
Figure 7 shows the network scan results for the Windows machine, which displays ms-wbt-server open on port 3389. After further research, our team found that 3389 is a common port for Remote Desktop Protocol (RDP), which we could use to gain access to the machine remotely. This RDP connection also helped verify which passwords worked for the Windows machine.

Figure 8: Using Hydra to Brute Force RDP
In order to brute force the RDP service running on the Windows machine, we used Hydra. Figure 8 displays the command our team used to gain credentials for the Windows machine.
Figure 9: Connected to the Windows Server
At this point, our team had accessed both necessary machines (Figures 9 and 6) to begin Objective 2.
OBJECTIVE TWO: ACCESS REMEDIATION
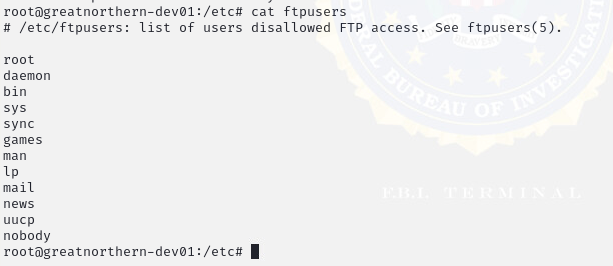
Figure 10: FTPUsers
Based on findings in Objective 1, our team decided to start with the Ubuntu machine and focus on the FTP service. The FTP service exposed administrator-level credentials and had anonymous access, a critical vulnerability as SSH was open on the Ubuntu machine. To remediate this issue, we first removed the root user from the list of users disallowed FTP access.
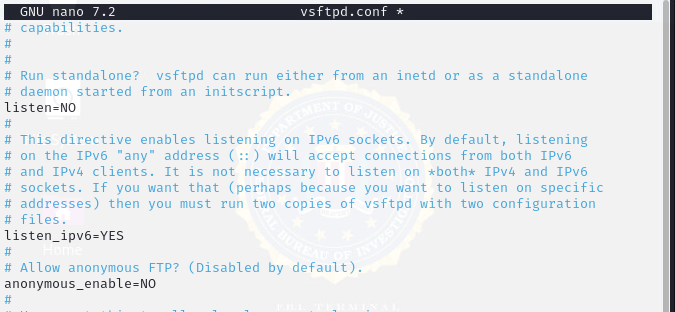
Figure 11: Disabling Anonymous Access to FTP
After removing root from the disallowed list, we disabled anonymous access and enabled local access so our team could edit the files displayed in FTP.

Figure 12: Deleting admin_note.txt
Removing the displayed credentials was the next step, completing the fortification of the FTP service on the Ubuntu machine.
Figure 13: Removing RDP from the Windows Server
Based on findings from Objective 1, it was evident that RDP was exposed to connect to the Windows server. To remediate this vulnerability, our team removed the RDP service from the Windows server. This should not be a problem, as there was only one IT worker previously, so the service should not have been configured. This finished the fortification of the RDP service that was exposed in Objective 1.
OBJECTIVE 3: PROOF OF COMPROMISE
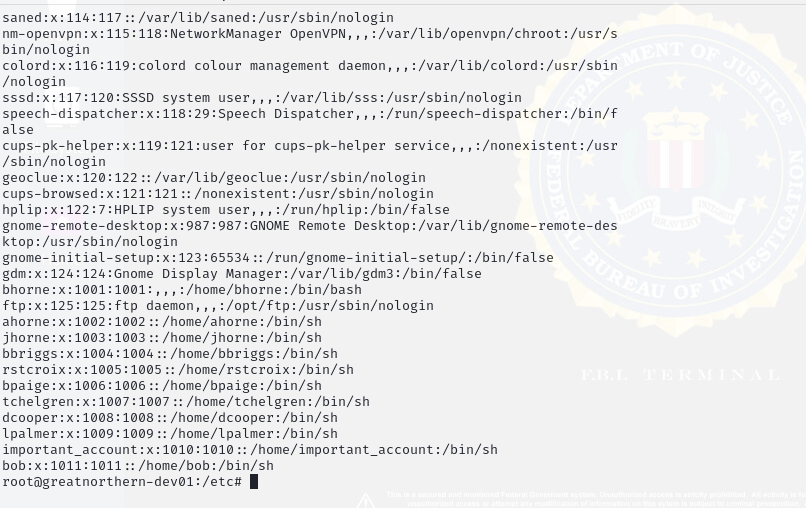
Figure 14: Users on Passwd List on Ubuntu Server
Figure 14 displays a long list of users on the Ubuntu machine. This is an indicator of compromise, as Laura was the only maintainer of the network. The long list of accounts displays a vulnerability in the system that attackers exploited.
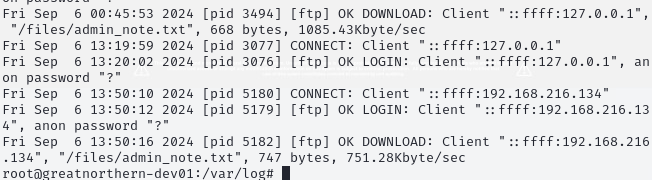
Figure 15: FTP Logs
Figure 15 shows a download of the admin_notes.txt file on September 6th, which corroborates with evidence found on the Windows server (Figure 19).

Figure 16: Auth Logs
Figure 16 shows examples of multiple system logins from different users, evidence of an attack, as multiple users logged into the machine within the same timeframe. Since Laura was the only IT manager, she would have been the sole person accessing these machines.
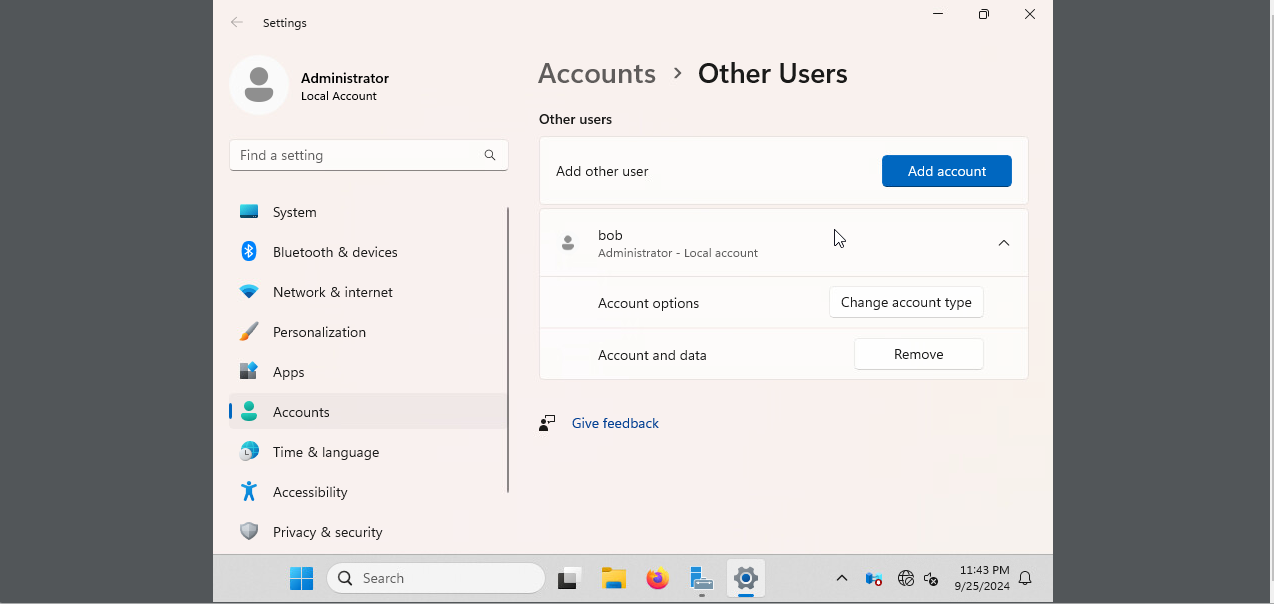
Figure 17: Windows Users
Figure 17 displays an administrative user “Bob.” This is evidence of compromise, as another admin user was present on the system. To remediate this, our team removed the Bob user and its files through the Windows GUI.

Figure 18: Checking Windows Admin Group
To ensure that no other administrative users were active or created, Figure 18 shows a PowerShell command used to check members of the Administrator group, which contained only our user.

Figure 19: Windows Event Viewer
Figure 19 displays a successful logon on 9/6/2024. After further research, we determined that NULL SID would be a deleted user, suggesting Bob was likely the culprit of this logon.
FINAL REMARKS
Within the given time frame, our team regained access, remediated attack vectors, and actively hunted for misconfigurations and indicators of compromise. To fully fortify this system, all users would be removed from the Linux machine except for the root user. A deeper investigation into both machines would be necessary to search for any resources allowing our adversary to maintain a connection to our network and systems. It is likely that one attacker or group caused this network disruption, as there was a common date of entry for both machines and a common username, “Bob,” on both systems. This evidence points to Black Lodge likely being responsible for the attacks across the network. With more time, these threats would be fully remediated.